How to Use AVR-Controller App - A simulated AVR ATmega328 CPU for Arduino Uno systems

If you want to build your own controller device, you could leverage an Android device and the AVR-Controller app to simulate an Arduino Uno.

To use AVR-Controller, start by downloading the Android app to your Android smartphone.

Link to AVR-Controller for Android smartphones

AVR-Controller is a simulated AVR CPU that might be helpful to the teacher, student, or hobbyist who wishes to develop and debug code for an AVR ATmega328 CPU which is the CPU in an Arduino Uno board.

Select compatible board

Arduino IDE


If you don't already have Arduino IDE installed, download it and install it. You might also want to leverage VisualINO if you want a visual programming model instead of the C or C++ programming languages.

Once installed, start Arduino IDE as you normally would as if you had an Arduino Uno board attached to your PC.

AVR-Controller is compatible with an ATmega328 which is the CPU in an Arduino Uno, so select that as your board type in Arduino IDE under the Tools menu.


Compile code

Arduino IDE


To create an AVR (Arduino Uno) program to run in AVR-Controller you will develop the program on another device such as a Window or Linux PC or laptop. See this Arduino Controller example for code that will flash AVR-Controller digital outputs on and off. Otherwise pick almost any of the numerous pieces of example code that come with Arduino IDE.

Once you think you're ready to compile and upload your code to an Arduino Uno, instead of uploading to an Arduino Uno board you will select to export compiled binary. This command under the Sketch menu will create a file on your computer with a *.hex extension in the same directory as your Arduino IDE project.


Load machine code

AVR-Controller AVR-Controller


After installing AVR-Controller, start AVR-Controller. You can then load the *.hex memory file into the simulated AVRs main program memory space. Load the *.hex memory file that has the machine code you want to run by loading it through the file open menu.


Run machine code

AVR-Controller


Once you've opened the AVR (Arduino Uno) program stored in a *.hex file, you should be at the main AVR-Controller view.

From the main AVR-Controller view, select Go/Run from the menu to execute the AVR (Arduino Uno) program. The Go/Run command will run the code just like if you had uploaded it to an Arduino Uno board. The window displays a simple representation of the Arduino Uno input and output pins. As your program runs the pins will be white or colored indicating the pin would be at 0 volts or 5 volts. If the program is designed to run forever, you can stop it by selecting Stop from the menu.

Digital outputs will show bits that are on as colored buttons and bits that are off as white buttons. Digital inputs can be clicked on to toggle between if the input is on (colored) or off (white). Clicking on a bit configured as digital output will not change it's state. Analog inputs are controlled by entering a numerical value. Buttons that are grey are there to represent pins that you would see on an Arduino board. Any text that the Ardunio is programmed to send to its serial output port will show up in a simulated 5 line LCD display below the digital and analog controls.

With AVR-Controller Pro, digital outputs from pin 4 through pin 11 will also be real outputs on a USB to parallel port adapter if you wire up the Advanced latch circuit . Specifically Arduino pins 4 through 7 or PD4 through PD7 are mapped to parallel pins D4 through D7, and Arduino pins 8 through 11 or PB0 through PB3 are mapped to parallel pins D0 through D3. Note that you need the latch circuit since AVR-Controller simulation can not pulse real output pins fast enough for a PWM circuit to work. In this way you could use AVR-Controller to act as a substitute for a Arduino Uno to control real electronics. Further, in addition to output, in AVR-Controller Pro 1.30 or greater, the simulated Arduino ADC ports allow you to sample Android sensor inputs if you are running on an Android device with light, pressure, proximity, relative humidity, or temperature sensors. 
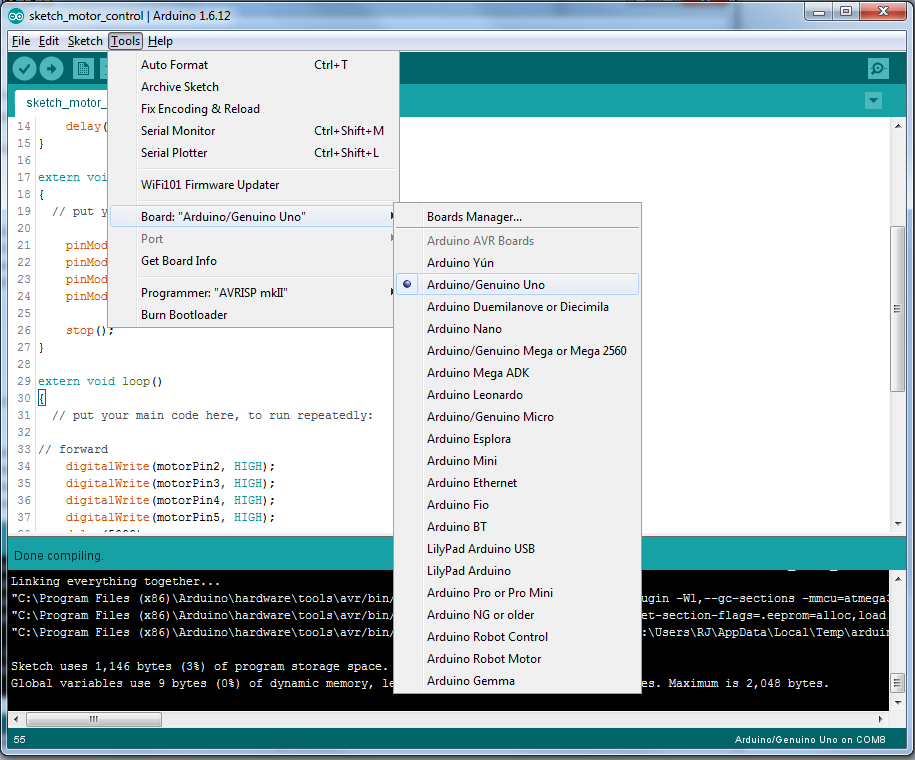
To create a Arduino program to run in USB-Controller Pro you will develop the program on another device such as a Window or Linux PC or laptop. Once you've opened the Arduino/AVR program stored in a *.hex file, you should be at the main AVR-Controller view.

Link to AVR-Controller for Android smartphones

Here's an example of the Arduino/AVR C code that can be used with AVR-Controller Pro to read the light, pressure, proximity, humidity, and temperature sensors. Note that you need to enable sensor input under the Settings options so that the sensors override the manual ADC input values. For an example of Arduino/AVR C code driving USB output ports see Arduino Controller example code .

  void SimpleDelay(int nTime)
  {
    while (nTime > 0)
    {
      nTime = nTime - 1;
    }
  }
 
  // These constants won't change. They're used to give names to the ports used:
  const char analogInSensorLight = A0; // Analog input port that the light sensor is attached to
  const char analogInSensorPressure = A1; // Analog input port that the pressure sensor is attached to
  const char analogInSensorTemperature = A2; // Analog input port that the temperature sensor is attached to
  const char analogInSensorProximity = A3; // Analog input port that the proximity sensor is attached to
  const char analogInSensorHumidity = A4; // Analog input port that the relative humidity sensor is attached to
  const char analogInSensorAmbientTemperature = A5; // Analog input port that the ambient temperature sensor is attached to
 
  short nSensorLight; // value read from the light sensor
  short nSensorPressure; // value read from the pressure sensor
  short nSensorTemperature; // value read from the temperature sensor
  short nSensorProximity; // value read from the proximity sensor
  short nSensorHumidity; // value read from the relative humidity sensor
  short nSensorAmbientTemperature; // value read from the ambient temperature sensor
 
  void setup()
  {
    // initialize serial com port at 9600 bps:
    Serial.begin(9600);
  }
 
  void loop()
  {
    // read the analog sensor inputs:
    nSensorLight = analogRead(analogInSensorLight);
    nSensorPressure = analogRead(analogInSensorPressure);
    nSensorTemperature = analogRead(analogInSensorTemperature);
    nSensorProximity = analogRead(analogInSensorProximity);
    nSensorHumidity = analogRead(analogInSensorHumidity);
    nSensorAmbientTemperature = analogRead(analogInSensorAmbientTemperature);
 
    // print the results to the serial monitor:
    Serial.print("Light = ");
    Serial.println(nSensorLight);
    Serial.print("Pressure = ");
    Serial.println(nSensorPressure);
    //// Serial.print("Temperature(deprecated) = ");
    //// Serial.println(nSensorTemperature);
    Serial.print("Proximity = ");
    Serial.println(nSensorProximity);
    Serial.print("RelativeHumidity = ");
    Serial.println(nSensorHumidity);
    Serial.print("AmbientTemperature = ");
    Serial.print(nSensorAmbientTemperature);
 
    // wait 5 seconds before the next loop
    // for the analog-to-digital converter to settle
    // after the last reading:
    SimpleDelay(5000);
    Serial.println();
  }


teraKUHN solutions
Hardware Setup Control System Hardware Abstraction Development Tools
Smartphone Controller
(with PWM or advanced latch circuit)
USB-Controller teraKUHN IO System (KIOS) Debug Z80 KCC80 KPC80
Smartphone Controller
(with advanced latch circuit)
AVR-Controller C & C++ coding abstraction macros Debug AVR Arduino C++
Arduino Controller
.
N/A C & C++ coding abstraction macros Debug AVR Arduino C++


Here are some architecture characteristics that can be demonstrated by these two control solutions. These differences can be used for teaching processor and microcontroller concepts.

control solutions
Z80 custom with KIOS AVR Arduino
CISC RISC
von Neumann architecture Harvard architectures
Run-time software abstraction layer Compile time coding abstraction macros
custom electonics board pre built Arduino board


Copyright (C) 2021 - 2024 R. J. Kuhn. Please note that you are not allowed to reproduce or rehost this page without written permission.

Flag Counter